A guide to my CQB/Urban loadout for this year’s England vs Scotland game, and what I’ve learned about kit from years of playing one of the toughest weekends in the airsoft calendar. Obviously, this is stipsniper.com, not stipcqb.com, and to be honest the urban side of the game really isn’t my strong point, although I do enjoy it because I get to play with my team a bit and it’s usually a good laugh. England vs Scotland however isn’t a laughing matter. I first started with the England team way back in 2014, bringing an AEG with a cheap rig and hoping it would be the usual skirmish type day, but for longer.

How wrong I was. Stirling Airsoft run some hardcore games, and the England vs Scotland game is brutal due to the competitive nature of it; there’s a trophy to be won and nobody wants to go home empty-handed. And the standard of play is very very high. Every time I’ve played, I’ve come home and sat and thought about what worked, and what didn’t, and what needs to be improved for the next year. The loadout evolves constantly, it’s as efficient as I think I can make it and I thought it might make a decent article to go through it and share that experience or generate some ideas for people who are looking at similar kits. I’ll add links to kit where I can find it.
Firstly, every airsoft loadout is designed for a specific purpose or role. This setup is for multi-day, largely urban games where I don’t have to carry a full campsite with me – the respawn area is visited unfortunately quite regularly throughout the event, and I have a large assault pack there with all my food, supplies, changes of clothes, tools and spare parts. Additionally, for this one we’re able to sleep indoors, albeit in very basic conditions, and requires a little less kit but you may want to check out The Camping Guide if you do get thrown out into the wild to sleep. Half of the event is played out in darkness, in the middle of winter, which has its own set of challenges and may or may not be something you want to factor in. Having said that, because of the way I’ve set this loadout up, it wouldn’t be a problem to sling a rucksack full of camp kit on the back.

Clothing
Clothing is usually the last thing on anyone’s mind, because as gear whores we love guns and gadgets more, but is more important to get right. The first thing to consider, whether you like it or not, is that some events might have strict uniform rules that you’ll have to adhere to. Although that might dictate the colours a little, you still need to select the correct types of clothing. The event I’m doing is in the north of England during December. Weather varies from -10 to 5 degrees celsius, usually battered by rain, wind, snow, or a combination of all three. It’s brutal, but adds to the challenge.

I wear ski baselayers for warmth without adding bulk that restricts mobility, being from the north myself I’m pretty used to the cold (Stirling staff last time out had to resort to wearing black padded bodywarmers over the top of BDU’s for warmth, but it’s always better to layer up underneath and keep all the warmth close to your body, especially if that shirt is getting wet). I’m also not usually bothered by getting wet for a few hours, as we normally have a radiator in the room to dry things overnight or rotate kit during the day, however this time due to COVID we’re all effectively sleeping outdoors so dry kit is important. The easiest and cheapest option is simply to carry spares, though while I am playing I’ll be making it as comfortable as possible. Inbetween my thermal leggings and outer BDU trousers, I’ll be wearing some Goretex DPM trousers which offer some breathability and will keep the inner dry regardless of how wet my trousers get, and because my legs are doing a lot of moving they take priority. Wearing these Goretex trousers underneath BDU’s will reduce that crinkly noise that some waterproofs make, and mean that in future I can just sling any camo pattern over the top.
The BDU’s themselves will be a pair of Teesar Multicam pattern (ish) trousers, a spare pair of Helikon Multicam pattern (ish) trousers, and an issue US Army Tricolor pattern shirt with a Miltec ACU cut spare Tricolor shirt. The Tricolor and Multicam mix goes quite well and is within uniform rules – I hate being plastered un Multicam these days because it’s hard to be identified in the field when you look the same as anyone else. I’ve got quite a bit of camo in my collection, and one thing I have noticed recently is just how much better the issue kit is compared to “airsoft” brand replicas, and is usually cheaper. Fits better, looks less like a cheap knockoff because it isn’t, and just feels more comfortable. I got my issue shirt for £12 off eBay but usually pay around £25-£35 for replicas, and will definitely be going back for more in the future. Spare socks are obviously important too, especially in the cold and wet.
For boots, I run a nice lightweight pair of Viper Coverts which aren’t waterproof, but are comfortable. I have a Cygnus Armoury snood type face mask, which was a present from the lovely GSG, in OD, and I’ll run a Kombat UK snood underneath just to keep my neck covered and warm. Eye pro will be a pair of Wiley X Sabers for looking cool in the safe zone, and some Bolle Silium glasses for the light-into-dark transitions that are a pain in the arse for some tinted eye pro. I find that glasses don’t fog on me where goggles might due to the open edges (as long as they don’t leave big gaps), and are less bulky. A pair of non-descript OD tactical gloves will finish off the look. Usually, I’d run Mechanix originals but the hard knuckle might be a life/finger saver when things get a bit close and nasty. In addition, I’m bringing three pairs of liner gloves and some fleece lightweight running gloves. It’s impossible to keep hands dry, but being able to regularly swap into warm dry gloves is vital when you’ve got to be able to operate the weapon and read maps etc in the cold and wet.
Guns

Can’t not talk guns, here are my two for this event. On the top, minus the optic which is usually a reflex but switched to a carry handle, is my G&P M7A1, a modern style M4 which I guess is my old faithful. The G&P externals are superb, and I did buy this gun for the VLTOR upper receiver primarily. It has a vertical grip which is much better than c-clamping a long M4 (modern trends…) because it forces you to tuck your elbows in tighter. In addition to the PEQ it does normally have a reflex red dot on a riser and is a compact size for building work. Internals got a full ASG upgrade a few years ago to improve performance and it’s never missed a beat since.
Underneath, is a battered old Classic Army M15A4 I got for £80 at my local site. The gearbox was sellotaped together and most of the internals were fried but it’s been lovingly restored and now performs better than any other AEG I own. It has taken a huge amount of amateur teaching to get it running smoothly, and the only accessory is a torch (from the M7A1) that has been taped onto the real steel XM177 handguard. Longer term, I’m looking at changing this either to a more Black Hawk Down style M4 with a silencer and paint job, or possibly take inspiration from an Australian SF M4 from the early days of the Afghanistan war. The charging handle fell out midway through the event but I will get that fixed eventually too.
No secondary, nothing weird or wonderful that may or may not work, no additional weight, no changing rigs for different weapons.
Load Bearing
Always my favourite bit. Get it right, and you can run smoothly and effectively. Get it wrong, and you’re over-encumbered, or unable to carry vital equipment, or just plain uncomfortable. In line with evolving this kit into an all round loadout that I can just pick up and go to any event in, I’ve chosen OD green to keep it all uniform. It works fine with desert and woodland kits, where I felt coyote brown maybe didn’t quite with the woodland. The centre piece to all this is an old school LBT 1879 type split-front chest rig.
Ok, this rig is a bit of a rarity but Arktis do some lovely split rigs too. Split rigs help in getting flat on the floor if you need to without squashing anything valuable. As a sniper, I’m used to going prone a lot to reduce my profile and stay as small a target as possible. If prone isn’t your thing, any good chest rig will do the same job, or you might consider one of the waistcoat type assault vests or a SAAV, and all have the advantage of just unclipping and coming off like a jacket when you need them to. Keeping the load onto the front means you can see and access it all, stops you from overheating in warmer weather because your back can breathe, and as mentioned above you can add a backpack if you’re on a bigger event or need to carry sleep kit. Yes, I used to run plate carriers and this is all stuff I’ve learned to change. BB’s don’t hurt enough to need armour plates, and the extra molle space on the back is a waste – worst case scenario is that I’m out there on my own and there’s no teammate who can access stuff on the back anyway.
Note as well that there’s no molle to play with. There’s a great argument for molle in that you can adjust everything to exactly where you want it, and can swap pouches out if you need to change things over. And it’s as much fun as building something out of Lego. But here’s my counterargument. No molle means that the rig overall is lighter, but also held in place better because it’s stitched on. I don’t need to swap pouches out because all my guns (sensibly in my view) are M4 based and all run STANAG type mags. And whatever else I need, I fit into the very generous utility pouches. There isn’t a great need to be able to move pouches constantly because it isn’t going to add speed or efficiency if you’re not used to where the stuff is. Additionally, I should be reloading from cover, not in between trigger pulls during a firefight and after years of playing, I can’t say I’ve ever been shot because I couldn’t pull a mag out quickly enough from a high speed kangaroo type mag pouch. If you are in a heated firefight, open the flap on a standard mag pouch and tuck it in behind the mags, giving you two quick access mags if needed. But longer games, it’s definitely worth having closed top mag pouches.
Molle systems too I think allow for overloading; it’s very easy to just keep adding stuff because it looks cool, or you can. Airsoft is great for buying and adding stuff and we’re bombarded with adverts for new kit that will apparently make us better players, but I try to keep my load as light and as simple as possible (see previous article here). My primary weapon is my only weapon, I don’t weigh myself down with two guns and two lots of extra mags. As long as that rifle keeps working, and I can keep feeding it ammo, I’m effective. I’ll be running 4x120rd mags in the rig, plus one in the gun at game on. A lot of people, especially those running 3,000rd drum mags, might find that ammo capacity a little light, but I very rarely run out. In the early days of airsoft, I learned that full auto suppression really was a bit of a waste of bb’s, once going through two full bottles (4,000) in an hour simply spraying into a treeline. While the enemy team simply sent a selection round to flank us. Now, I’m a lot more considered with shot selection and keep it on semi auto at all times, and I’m a lot better with ammo management (making sure I reload mags when I can and make sure I’m keeping a full mag in the gun where possible. Like on Call of Duty or whatever you play when you get into the habit of reloading after every few shots).
Here’s what I keep in my pouches;

I’ve rigged a Blackhawk hydration pack onto the straps on the back of the rig largely to give some molle loops (I know…) to thread a custom made flexible radio antenna through. Shoulder straps are the rather excellent Särmä TST PC18 shoulder pads from Varusteleka which allow me to keep all my wires in the right place as well as a little extra padding.
The ALICE belt doesn’t have any pouches on at the moment, but can if needed and I would love to add an ALICE butt pack for looks. I actually found some useful green tactical clips which you can see holding the belt to the D rings on the chest rig on Amazon (link here). They’re surprisingly well made for the price, more then robust enough unlike some cheap clips, and are a very useful little addition. The actual LBT setup was going to cost far too much even if I could find it.
- Radio – Often underused and a less common sight on airsoft fields now. The team that talks is the team that wins, as a local site owner once put it to me. It’s key to know where your teammates are, where the enemy is, and what the overall game plan is. I run a Baofeng UV-82 (article) which allows me to be on two channels at once, ideal for squad communications and listening in to HQ at the bigger events. The dual PTT fist mic cost me £3 off ebay and has a standard 3.5mm jack in it, to which I’ve attached an old school D-ring earpiece which is compact, stays on my ear and is very cheap to replace. Throat mics are too uncomfortable personally; I don’t want to feel like someone is grabbing my throat while I’m trying to do stuff. Big headsets will restrict my hearing.
- Mags – 4 normally, but for this pic just demonstrated a few extra.
- Spare ammo and speedloader – on the off chance I do run out. Ammo goes in plastic food bags, which fit into spaces more easily and don’t rattle like a bottle.
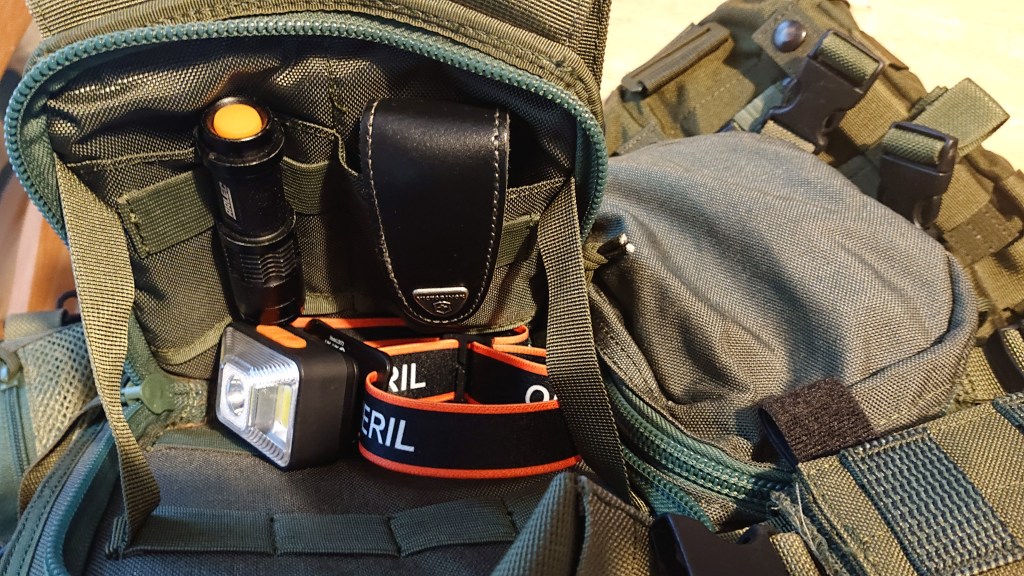
- Maps and objectives – these are old ones just to demonstrate. But you do need to know where you’re going. You might want to add a compass in there for bigger sites. This is a Warrior Tactical Wrist Case, and it’s useful just to keep on your wrist for quick access, though not necessary.
- Torch with red light filter – for the maps. Red light at night doesn’t highlight you like a massive white beacon, but is enough light to read by when you need to remember what it was you were doing. In keeping with the kit, it’s an old school style Miltec right angle torch which is pretty good for the price and does come with other colour filters too, as well as off/on/push to illuminate modes which is handy if you forget to turn it off again.
- Pyro – I’ll carry some, not a lot to show here because I’ll be picking it up on site anyway. I don’t know whether its the sniper in me, but especially at night I try to avoid loud bangs because it alerts people nearby.
- Blackhawk Hydration pouch – useful 3L capacity bag although mainly for the antenna to loop through. Obviously it could actually be used for hydration, and I did consider carrying a dry shirt in a dry bag, but at no point during the game do I want to be in a position where I’m taking my gun, rig and comms off to change clothes. Useful extra capacity if needed.
- Spare battery for rifle in a waterproof plastic food bag
- Dump pouch with glowsticks – Didn’t use, but glowsticks anyway
Behind the mag pouches on this rig are two admin pouches. You could easily use a shirt pocket or find space among your pouches, but the key kit here is a waterproof notebook and pen/pencil so you can take and make notes. And I found a headtorch extremely useful. I know the Petzl ones can get stupidly expensive for a battery box on elastic and some LED’s, so I found this cheap Amazon head torch after recommendations from a wild camper and for the price, it’s been absolutely superb. Used when I’d been shot and had to get back to base in the dark, and also digging around in a deployment bag for food and ammo.


There’s no need for speed cuffs, abseiling harness, ropes, dummy radios, extra weapons and mags that will barely get used, a three course meal, cookset, tarp, cameras, laptop, autograph book, spare wheel for the jeep or anything else. It’s all dead weight and noise that you really don’t need.
The only other bit of load bearing I’m using for this event is a Blackhawk (yes, I collect) molle drop leg to mount a dump pouch onto. The reason the dump pouch isn’t on my belt, is that I wear long shirts untucked so that my ass doesn’t pop out and the dump pouch last year was on the belt which proved to be a little high up and sometimes was covered by excess shirt. The drop leg just lowers it a little. It’s also a useful place to put gloves and eye pro in when in the safe zone grabbing food, so that they don’t get put down or lost.
Do I carry a first aid kit? Not on me, no. I do have one in my deployment bag back in respawn which is kitted out for ailments rather than trauma, so there’s paracetamol for hangovers and deep heat and ibuprofen gel for my back (long standing issue), and a few basic bits and pieces but nothing complicated. I’m still yet to have any kind of in game injury after all these years, and I can’t recall actually seeing anyone needing assistance in game either. Having only basic first aid training anyway, it’s not like I’m qualified to perform surgery in the middle of a game.
Anything missing? Drop it in the comments. Hope this little “stepping it up” section has been useful for people looking to do something a little more than just skirmish, but are maybe put off by the perception that you’re going to have to spend thousands to join in. I certainly haven’t.

One thought on “Stepping it up – An Urban Airsoft Loadout”